NActor对象
在Nibiru Stuido引擎中,Actor是场景中的基础对象,它是所有游戏实体的容器。几乎所有在引擎中可见的物体、脚本、声音、粒子等都基于Actor。它并不直接拥有渲染、物理、脚本等功能,而是作为一个容器来挂载不同的组件,这些组件才是真正实现各种行为的关键。
| 接口名称 | 返回值 | 接口含义 |
|---|---|---|
| IsActiveSelf | bool | 判断actor自身是否是激活状态 |
| GetTag | std::string | 获取Tag |
| SetTag | void | 设置Tag |
| SetLayer | void | 设置层级 |
| SetTagName | void | 设置tag的名称 |
| GetLayer | uint32 | 获取层级 |
| SetName | void | 设置actor名称 |
| GetName | std::string | 获取Actor名称 |
| Destroy | void | 销毁 |
| IsRaycastTarget | bool | 判断是否参与射线拾取 |
| GetChildren | std::vector<NActorPtr> | 获取所有子控件 |
| GetChildrenByName | std::vector<NActorPtr> | 通过名称获取子控件 |
| SetActive | void | 设置激活状态 |
| SetSelfActive | void | 设置自身激活状态 |
| SetParent | void | 设置父节点 |
| HasParent | bool | 判断是否有父节点 |
| GetParent | NActorPtr | 获取父节点 |
| GetWorldAABB | AABB | 获取世界空间的自身AABB包围盒 |
| GetWorldAABBMergeChildren | AABB | 获取包含所有子控件世界空间的AABB包围盒 |
| GetLocalAABB | AABB | 获取mesh包围盒 |
| GetWorldOBB | OBB | 获取世界空间的OBB包围盒 |
| GetWorldOBBMergeChildren | OBB | 获取包含所有子节点的OBB包围盒 |
| GetLocalOBB | OBB | 获取mesh包围盒 |
| SetRaycastTarget | void | 设置是否参与射线拾取 |
| GetComponents | std::vector<NWeakObjectPtr<NComponent>> | 获取Actor身上挂载的所有组件 |
| GetComponentsInChildren | std::vector<NWeakObjectPtr<NComponent>> | 获取包含子节点身上挂载的所有组件 |
| SetActorScope | void | 设置Actor生命范围 |
| GetActorScope | EActorScope | 获取Actor生命范围设置 |
| AddComponent | bool | 添加脚本 |
| HasComponent | bool | 判断是否挂载某个脚本 |
| RemoveComponent | void | 移除组件的挂载 |
| GetSiblingIndex | uint32 | 获取同级索引值 |
| SetAsFirstSibling | void | 设置Actor在同层级的最上面 |
| SetAsLastSibling | void | 设置Actor在同层级的最下面 |
| SetSiblingIndex | void | 设置Actor在同层级里的索引值 |
| CloneActor | NActorPtr | 克隆Actor |
| IsStatic | bool | 判断是不是静态Actor |
属性面板介绍
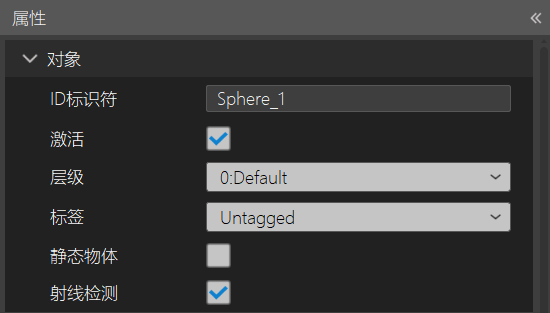
- ID标识符:该对象的名称。
- 激活:对象是否为激活状态。勾选对象为激活状态,不勾选对象为隐藏状态,
- 层级:是一种用于对对象进行分类的机制。通过将对象分配到不同的层级,开发者可以控制对象的渲染顺序、物理碰撞检测、光照计算等。
- 标签:是用于标识对象的另一种机制。与层级不同,标签是字符串形式的标识符,可以更灵活地用于对象的分类和查找。
- 静态物体:该对象是否设置为静态物体。
- 射线检测:该对象是否接受对象检测。
设置和获取激活状态
bool IsActiveSelf();
void SetActive(bool value);
void SetSelfActive(bool bActive);
参数:
| 参数 | 说明 |
|---|---|
| value | 要设置的激活状态 |
| bActive | 要设置的激活状态 |
描述:上述接口SetActive是设置自身同时包含所有子控件的激活状态,SetSelfActive接口只是设置自身的激活状态。
代码示例:
void NImageViewTest::Start()
{
	auto actor=GetNActor();
	actor->SetActive(false);
	actor->SetSelfActive(true);
}
设置和获取Actor的层级
void SetLayer(uint32 layer, bool recursiveChildren = true);
uint32 GetLayer();
参数:
| 参数 | 说明 |
|---|---|
| layer | 要设置的Actor的层级 |
| recursiveChildren | 是否要递归设置所有子控件 |
描述:设置Actor的渲染层级,当Camera进行渲染时,如果Camera设置的剔除遮罩不包含此层级,那么这个camera将不会渲染此控件。
代码示例:
void NImageViewTest::Start()
{
	auto actor=GetNActor();
	auto camera=NCamera::MainCamera();
	camera->SetRenderMask(10);
	actor->SetLayer(10);
}
设置和获取Actor的名称
void SetName(const std::string& name);
std::string GetName();
参数:
| 参数 | 说明 |
|---|---|
| name | 要设置的名称 |
描述:通过上述接口可以设置当前actor的名称,不过Actor的名称都是在创建时就已经设置好,可以通过此接口进行修改。
代码示例:
void NImageViewTest::Start()
{
	auto actor=GetNActor();
	auto name=actor->GetName();
	actor->SetName("Test_name");
}
设置Actor是否参与射线拾取
bool IsRaycastTarget();
void SetRaycastTarget(bool isRaycastTarget, bool containChildrens = true);
参数:
| 参数 | 说明 |
|---|---|
| isRaycastTarget | 是否参与射线拾取 |
| containChildrens | 是否包含子控件 |
描述:通过上述接口可以设置Actor是否参与射线拾取,如果不参与,将收不到事件回调。 代码示例:
void NImageViewTest::Start()
{
	auto actor=GetNActor();
	actor->SetRaycastTarget(true,true);
	auto israycast=actor->IsRaycastTarget();
}
获取子控件
bool IsRaycastTarget();
void SetRaycastTarget(bool isRaycastTarget, bool containChildrens = true);
参数:
| 参数 | 说明 |
|---|---|
| name | 子控件的名称 |
| recursively | 是否递归所有的子控件 |
描述:通过上述接口可以获取所有子控件和所有指定名称的子控件。 代码示例:
void NImageViewTest::Start()
{
	auto actor=GetNActor();
	auto childs=actor->GetChildren();
	auto testchilds=actor->GetChildrenByName("Test",true);
}
设置或获取父控件
void SetParent(NActorPtr parent);
void SetParent(NActorPtr parent, bool worldPositionStays);
bool HasParent();
NActorPtr GetParent();
NActorPtr GetParent(bool recursiveToRoot);
参数:
| 参数 | 说明 |
|---|---|
| parent | 要设置的父控件 |
| worldPositionStays | 是否保持世界空间位置不变 |
| recursiveToRoot | 是否需要递归根节点 |
描述:通过SetParent接口可以将Actor添加到一个父节点下
代码示例:
void NImageViewTest::Start()
{
	auto actor=GetNActor();
	auto parent=NActorManager::GetActor("parentAct");
	actor->SetParent(parent);
}
获取控件的包围盒
AABB GetWorldAABB() const;
AABB GetWorldAABBMergeChildren() const;
AABB GetLocalAABB() const;
OBB GetWorldOBB() const;
OBB GetWorldOBBMergeChildren() const;
OBB GetLocalOBB() const;
返回值:
| 返回值 | 说明 |
|---|---|
| AABB | AABB包围盒对象 |
| OBB | OBB包围盒对象 |
描述:通过上述接口可以获取控件的包围盒信息.GetWorldAABB、GetWorldOBB接口获取世界空间的包围盒信息,GetLocalAABB、GetLocalOBB接口是获取局部空间的包围盒信息,GetWorldAABBMergeChildren、GetWorldOBBMergeChildren接口是获取世界空间的包围盒信息,同时merge了所有子控件的包围盒结果。
代码示例:
void NImageViewTest::Start()
{
	auto actor=GetNActor();
	auto aabb=actor->GetWorldAABB();
	auto aabbMerge=actor->GetWorldAABBMergeChildren();
	auto obb=actor->GetWorldOBB();
	auto obbmerge=actor->GetWorldOBBMergeChildren();
}
设置和获取Actor的生命范围
void SetActorScope(EActorScope type);
EActorScope GetActorScope();
参数:
| 参数 | 说明 |
|---|---|
| type | Actor的生命范围,Level表示当前场景,Global表示整个应用进程 |
描述:通过上述接口可以设置Actor生命范围,默认为Level,这意味着它将在离开Level时销毁,如果将actor设置为Global,则actor将在整个应用程序生命周期中存在。
代码示例:
void NImageViewTest::Start()
{
	auto actor=GetNActor();
	actor->SetActorScope(EActorScope::Global);
	auto type = actor->GetActorScope();
}
设置和获取Actor的生命范围
bool AddComponent(const std::string& componentName);

template <typename T>
bool HasComponent(std::enable_if_t<!IsInternalComponent<T>::Value, NWeakObjectPtr<T>> comp)

template <typename T>
void RemoveComponent(std::enable_if_t<!IsInternalComponent<T>::Value, NWeakObjectPtr<T>> comp)
描述:通过上述接口,开发者可以在运行时添加脚本组件,移除脚本组件。 代码示例:
void NImageViewTest::Start()
{
	auto actor=GetNActor();
	auto testcomp=actor->AddComponent<NButtonTest>();
	auto has=actor->HasComponent<NButtonTest>(testcomp);
	if (has)
	{
        actor->RemoveComponent< NButtonTest>(testcomp);
    }
}
置Actor同级索引
uint32 GetSiblingIndex();
void SetAsFirstSibling();
void SetAsLastSibling();
void SetSiblingIndex(uint32 index);
参数:
| 参数 | 说明 |
|---|---|
| index | 索引值 |
描述:通过上述接口设置控件在兄弟节点之间的排序,一般只有对UI控件设置索引有效果,会影响UI的渲染顺序,渲染效果就是后渲染的会遮挡前渲染的UI.
代码示例:
void NImageViewTest::Start()
{
    auto actor=GetNActor();
    actor->SetAsFirstSibling();
    actor->SetAsLastSibling();
    actor->SetSiblingIndex(5);
}
克隆一个控件
NActorPtr CloneActor() const;
描述:通过上述接口可以克隆一个和原始控件一模一样的新控件,这个接口在重复创建多个相同控件时经常使用。
代码示例:
void NImageViewTest::Start()
{
    auto actor=GetNActor();
    auto newActor=actor->CloneActor();
    newActor->SetName("cloneActor");
    newActor->SetParent(actor->GetParent());
}